-
One-of-A-Kind Ornaments
- New Arrivals 12-23-25
- All Ornaments for Sale
- Glass Ornaments
- Tree Toppers
- Cotton Ornaments
- Candy Containers
- Paper Ornaments
-
Sold Ornaments Gallery
- Sold Christmas Ornaments
- Sold Fantasy Ornaments
- Sold Animal Ornaments
- Sold St. Patrick's Day
- Sold St. Valentine's Day
- Sold Easter/Spring Ornaments
- Sold Patriotic Ornaments
- Sold Halloween Ornaments
- Sold Glass Ornaments
- Sold Tree Toppers
- Sold Candy Containers
- Sold Cotton Ornaments
- Sold Paper Ornaments
- On Sale Now!
- Clearance Items!
- Custom Orders
- Glass Bead Garlands
- Feather Trees
- On Sale Now!!!
Make Your Own Ornament DIY
 Paper Doll Ornament Crafting Project
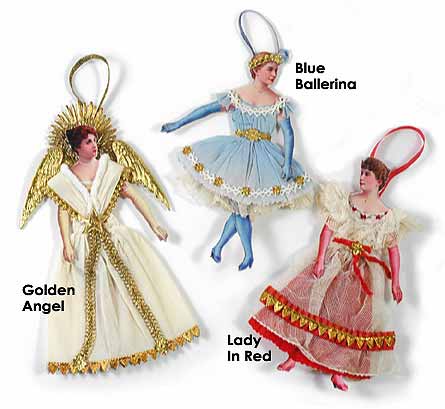
We want you to have some of your own fun and make an ornament in the same fashion that Victorian families did over 100 years ago. Crafting was an enormously popular Victorian pasttime. Families often made their own ornaments with supplies that were available around the household. We'll show you how you can make handmade paper doll ornaments that look like the ones below, or use your own imagination as you desire. Look for delicate vintage lace trim, cording, ribbons, netting and fabric that you may find around your home or at flea markets and antique stores. We also provide you with companies you can contact for other beautiful trims and accessories! Dress the dolls in different ways and fill a feather tree with your creations!
What You'll Need
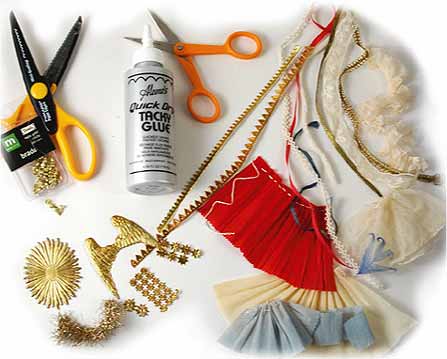
Below is a list of supplies and suggested sources. However, feel free to use ANY kinds of novelty trims, fabrics and papers that catch your imagination! Just remember, vintage materials will make your dolls look more old-fashioned.
Special Note About Gold Dresden Paper Trim
The gold Dresden trims are old-style foil-covered embossed papers imported from Germany. On our ornaments we use the old-stock trims that are between 50 and 100 years old. The good news for you is that new Dresden Paper trims are widly available on-line. The gold papers we used in this project were purchased from Blumchen.
Your Local Craft Store:
-Mini gold circle brads
-Small hole punch -Aleene's tacky glue
-Glue applicator
-Small glue applicator tip
-Precision cutting scissors
-Mini-scallop edging scissors
-Light-weight cardboard
-Crepe paper
-Feathers
Thrift & Antique Shops:
-Vintage crepe paper
-Petite vintage ribbon or cording
-Petite vintage lace trim
-Vintage cotton netting
-Vintage fabrics
-Vintage tinsel garland
Gold Papers Purchased from Blumchen:
(866) 653-9627
Part numbers for items we used on specific dolls are provided below: Dresden "Graduated Stars" #DT83G; Dresden "Rosette Star" #DT84G; Dresden "Pennant Points" border #DT28G; Dresden halo #DT73G; Ivory chenille roping #CRF16
Print Out and Assemble Your Paper Dolls
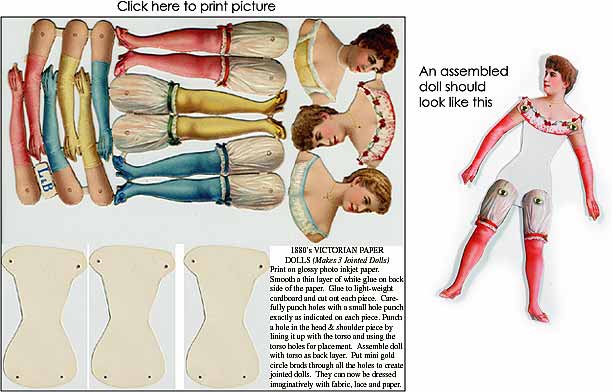
The first step is to print the page below and cut out and assemble your paper dolls. We have provided you with three rare circa 1880's German-made paper dolls. Simply click on the picture below to print it out and follow the instructions to assemble your dolls. (Unless you have high-speed internet, please allow several minutes to download this file.)
If you have trouble printing this picture, you may not have Adobe Acrobat Reader, which is a free downloadable product. To get a free copy of the reader, click here- download Adobe Acrobat Reader.
 Decorate Your Dolls
Embellish each doll in creative ways to suit your fancy! Print out more dolls, dress them in fanciful costumes and fill a small table-top tree with your creations! To get you going we've provided you with instructions for decorating two dolls: "Blue Ballerina" and "Golden Angel"
How to Make Blue Ballerina

Load your white glue into glue applicator bottle and attach a small glue applicator tip to the open end. To create petticoat, cut a piece of (1.) cotton netting or lace 16" wide by 2 1/2" long. Hand-baste top edge and gather threads to approx. 2 1/2" wide. Glue petticoat around the waistline of blue doll, starting and ending on the center of the back side. For skirt, cut a piece of (2.) light-blue crepe paper 13" wide by 2" long. Cut bottom edge with mini-scallop edging scissors and baste and gather top-edge to 2 3/4" wide. Glue over petticoat, starting and ending in the middle of the back side and overlapping front and back edges. Glue back sides of skirt together. For bodice cut a piece of (3.) crepe paper 5" wide by 1" long, hand-baste both top and bottom edges, and gather top and bottom edges to approx. 3" wide. Wrap top and bottom of bodice around mid-section of doll and glue it in place, using the same technique as the skirt. Make sleeves with two pieces of (4.) crepe paper 2" wide by 3/8" long, cutting bottom edge with mini-scallop edging scissors. Baste and gather top-edge of each sleeve to 1" and glue down to shoulders. Glue (5.) 1/4" wide cotton lace trim to neckline, covering up your baste stitches so they don't show. Glue lace trim 1/4" above the bottom edge of skirt. Glue (6.) gold Dresden trim and stars as shown on finished doll. For headband, after you glue trim around the head, glue a small piece of (7.) blue feather to front of the headband, and cover glued edge with a Dresden star. Tie together an 8" length of (8.) blue silk cording and glue the knotted side to the back of the doll, right below her head. Cover the raw edges of the cording with a gold Dresden star. Your doll is now finished!
How to Make Golden Angel

Load your white glue into glue applicator bottle and attach a small glue applicator tip to the open end. To create skirt, cut a piece of (1.) cream-colored crepe paper 4" wide by 10" long. Baste and gather top-edge to 2 1/2" wide. Glue top-edge of skirt around the waistline of yellow doll, starting and ending on the center of the back side. Glue overlapping edges and back sides of skirt together. For bodice/sleeves cut two pieces of (2.) crepe paper 1 1/4" wide by 3 1/2" long. Fold each piece in half along its length, and hand-gather and glue one side of each piece to front of skirt at waistline (as seen on finished doll). Wrap one piece over the shoulder and glue it down on the back side of the doll at the waistline. Wrap the other piece over the other shoulder and glue it down on the same spot on the back of the doll (overlapping the pieces) . Glue (3.) 1/4" wide cotton chenille roping to neckline, creating a deep "V" shape in the front and back of bodice. Glue (4.) 1/4" gold lace trim in an upside down "V" shape on front of skirt. Glue (5.) gold Dresden trim and stars as shown on finished doll. Cut (6.) gold Dresden wings in half and affix them to back of doll at shoulders. Glue 2" piece of (7.) gold tinsel garland behind doll's head. Center (8.) halo behind head and glue it in place. Tie together an 8" length of (9.) metallic gold cording and glue the knotted side to the center of the back of the halo. Cover the raw edges of the cording with a gold Dresden star. Your doll is now finished!
